
If you have encountered more than a handful of budgets, you have hit this fork in the road. Almost all clinical trial protocols include lab tests, yet sometimes it is not immediately clear if they should be performed locally at the site or the sponsor prefers to use a central lab.
Local vs. Central Lab was one of the first things I was taught when I started in clinical trial budgeting – and it stuck immediately, because the reasoning is so logical once someone explains it. What surprised me later was how often it gets missed, even by experienced teams. I once reviewed a budget from one of the top 5 CROs in the industry and found that the entire lab section had been built incorrectly – local lab codes applied throughout a study that needed central lab as the primary setup. A mechanical build, a surface level QC and not a single pause to ask why. The cost per patient came out at $20,000; the correct figure was $17,000. Three thousand dollars per patient, across a multi-site global study of a few hundred participants, leading to a discrepancy of several million dollars because no one stopped to read the protocol’s lab section carefully, or even bothered to question assumptions.
This article breaks down exactly how the central vs. local lab determination affects your budget, which CPT codes to use in each scenario, and how to handle the situations that aren’t clearly spelled out.
Why the Distinction Matters
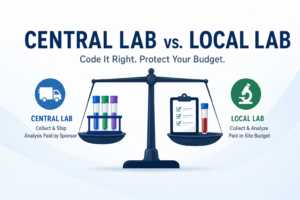
The core principle is straightforward: local labs are paid through the site budget; central labs are not.
When a sponsor contracts with a central laboratory directly, that lab handles the actual analysis of the samples. The site’s job is to collect the sample and ship it – and that’s all you’re paying them for in the budget. The cost of running the test itself sits in a separate sponsor-to-lab agreement that has nothing to do with the site-facing budget.
When a lab is local, the site collects the sample and performs the analysis in-house. Every test needs its own line item, coded separately.
Getting this wrong is expensive in both directions. Including full local lab codes for a central lab setup inflates your cost per patient and will get flagged by the sponsor. Treating a local lab as central means the site won’t get paid for work they’re actually doing and site budgets will need to be amended, which has the potential to cause delays.
Note: You need to be careful even if the protocol is clear as day that a central lab should be used. There are instances where a local lab for some or all procedures still needs to be accounted for in case the site performs them locally. Be vigilant, read through the relevant sections in the protocol and think what can trip you up. Below is an example of what I am talking about:
Central Lab: What You Code and Why
For central lab scenarios, you’re coding two things only:
Sample collection: Use 80299 (or an equivalent) for most draws. This is the standard central lab collection code. It covers the site’s time and effort acquiring blood, urine, or other samples, processing, and preparing the sample for shipment.
Shipping: Use 99000 for each shipping event. This covers the handling and transport of the sample to the central lab.
A few important rules here:
- In central lab studies, budgeting should be driven by sample logic, not lab procedure logic. You do not need to list the individual tests. The central lab agreement handles that. What you need to do is rename this line in a way that is clear what tests are being performed centrally, so the QC-er, the sponsor and the sites can all understand at a glance what’s included.
- As mentioned above it does not include the cost for any sort of analysis. This might confuse some sites and they might ask for something like $400 for a urine sample but as you might guess this is far from reasonable.
- One 99000 per visit, not per test. If multiple samples are collected at the same visit they are assumed to be shipped together. You’re paying for the shipping event, not per tube or per sample. Think of it as all samples going in one box. At the end of the day when all samples have been collected, that box gets shipped to the central lab.
- If multiple blood tests (Hematology, Serum Chemistries and a Coagulation panel) need to be performed at a single visit, it is generally assumed that a single sample can be used. If you have doubles reach out to your CTM or clinical team.
Assume that Pharmacokinetic (PK) Samples are always separate from other blood samples
Even in a central lab setup, PK samples generally need their own line due to complexity, the type of lab that actually performs the tests on the samples and the specific shipping and handling. Additionally, the protocol will usually have a dedicated PK sampling schedule – often with its own table showing exact timepoints and number of draws per visit – and that needs to be counted and coded separately.
Local Lab: What You Code and Why
For local labs, you’re coding the actual tests. This is more granular work, and the protocol’s SOE is your source of truth for what’s being tested at each visit.
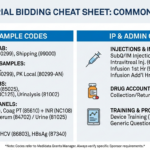
The most common local lab components and their standard codes (these may be CRO/FMV tool-specific):
| Procedure | CPT Code |
| Hematology with differential | 85025 |
| Serum chemistry, 13+ markers | NC125 |
| Serum chemistry, 12 or fewer markers | NC124 |
| Urinalysis with microscopy | 81002 |
| Coagulation – PT | 85610 |
| Coagulation – INR | NC108 |
| Coagulation – aPTT | 85730 |
| Lipid panel | 80061 |
| C-reactive protein | 86140 |
| Serum pregnancy test | 84702 |
| Urine pregnancy test | 81025 |
| HIV (local serology) | 86703 |
| HCV | 86803 |
| HBsAg | 87340 |
A few things to keep in mind:
Chemistry panels: Use NC125 for 13 or more markers (most standard chemistry panels) since it’s more expensive and more accurately reflects the work involved. If the protocol specifies fewer than five individual chemistry markers, break them out individually rather than using a panel code. For example, if only a lipid panel is being run, use 80061 rather than NC125.
Coagulation: When the protocol doesn’t specify whether PT, INR, or aPTT is needed, use PT (85610) and INR (NC108) together. If aPTT is explicitly called out, add 85730.
Pregnancy tests: Unless the protocol specifies otherwise, assume the first test is serum and subsequent tests are urine. Assume that both are always local lab, and taken at 50% (Women of Childbearing Potential assumption) unless otherwise specified. Always mark these as invoiceable.
Mixed Labs: How to Handle the Ambiguity
Mixed lab setups are very common – and the most frequently handled incorrectly. The default assumption when no further specification is available:
Safety labs (Hematology, Chemistry, Urinalysis, Coagulation) = Local. PKs and PDs = Central.
This is the standard approach, which you should document clearly in your assumptions that allows you to proceed with your work on the budget without bottlenecking the budget building process. Needless to say, any question or clarifications you might need should be discussed with the CTM/clinical team before your template becomes final.
For everything coded as central in a mixed setup, use 80299 and 99000 as described above. For the local safety labs, code them individually as outlined in the local lab section.
One thing worth being honest about: even when you do everything right, this can still come back to bite you. Building a mixed lab budget on the standard assumption, getting through development and QC, and then receiving a message at CTM review that it’s actually all central. The rework should not be endangering study activation at that stage since it typically gets caught before the budget reaches the site, but it’s a significant amount of time to spend fixing something that the protocol or the study team should have specified clearly in the first place. There’s no lesson there beyond documenting your assumption visibly so that during their review, the CTM has something concrete to react to. A clearly stated assumption gets corrected quickly. An undocumented one creates confusion if something was overlooked or omitted intentionally.
Pharmacodynamic (PD) Biomarkers – the misunderstood cousin of the PKs
Both are biomarker sampling types that often appear together in oncology and other complex studies, but they measure different things.
PKs measure what the body does to the drug. Specifically: how the drug is absorbed, distributed, metabolized, and eliminated over time.
PDs – Measure what the drug does to the body. PD sampling tells the sponsor whether the drug is actually doing what it’s supposed to do at a biological level, not just whether it’s present in the bloodstream.
From a budget perspective, pharmacodynamic biomarkers are genuinely situation-dependent and worth thinking through carefully. As a rule of thumb, if the PD biomarker and PK samples are collected on the same days and from the same draw, it may be defensible to combine them under the PK code. If they occur on completely different days or use different sample types, they should be coded separately.
What to Document in Your Assumptions
Lab assumptions are among the most important entries in the list of assumptions you give to your QC-er. At a minimum, document:
- Whether labs are central, local, or mixed
- If mixed: which tests are local and which are central, and why
- Whether the determination came from the protocol, the clinical team, or a default assumption
- Any combined draws and your rationale for combining them
- PK sampling timepoints if they differ from the standard visit schedule (often in a footnote/table)
- Conditional tests (e.g., coagulation at 50%, pregnancy at WOCBP 50%) and what drove that assumption
The goal is that a QC reviewer – or a sponsor – can read your assumptions and understand exactly how you arrived at every lab line without needing to go back to the protocol themselves.
Getting the lab setup right is one of the more reliable ways to demonstrate solid protocol literacy during the QC process. It’s also one of the areas where quick assumptions and default patterns can quietly produce either over-inflated or incomplete budgets.
Looking for a practical tool to make sure your budget catches every common lab coding mistake before it goes to QC? Check out the Budget QC Checklist – a ready-to-use Excel template built around the same operational logic covered in this article.
Find out who I am and what I am fighting for.
If you agree, disagree, or think this is nonsense, email contact@clinicalbudgets.com
If you’d like me to cover a specific topic, you can suggest it here.